How to draw a lop-eared rabbit drawing lesson and printable worksheet.
The free worksheet at the bottom of this post and the project notes below may be printed by highlighting and sending it to your printer or saving to your device for printing later. If you have problems with printing see the HOW TO PRINT tab for some helpful tips.Parents, teachers, and home school families will find this helpful for the classroom and home.
YOU CAN HELP
This worksheet is free but your small contribution to support my art will be appreciated, click on the Paypal link or the DONATE tab to learn more. Thank you.
YOU MAY PRINT THE PROJECT NOTES BELOW.
BEGINNINGS
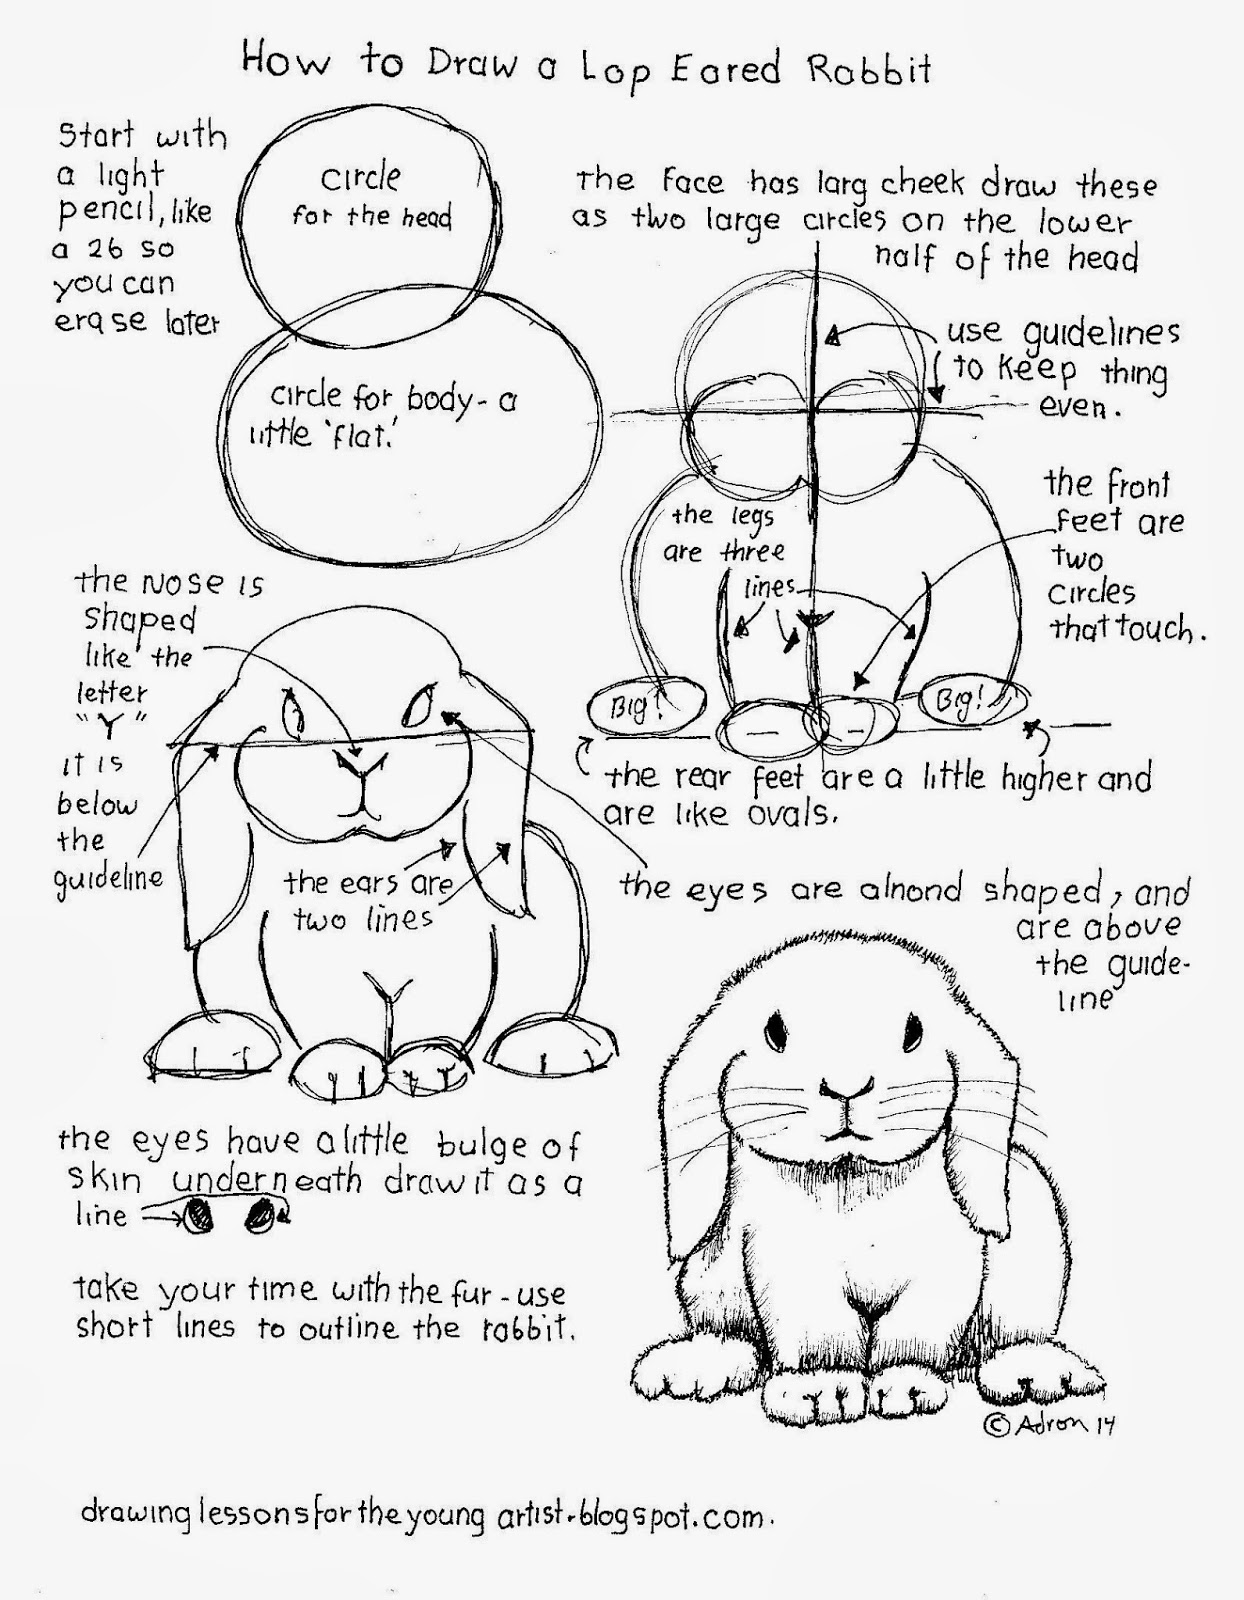
Start with a light pencil like a 2b and draw lightly so you can erase later. Build the shape using circles to compose the structure of the drawing. Draw a circle for the head and a larger circle for the body. Use a guideline down the middle to keep things even. At the bottom add two circles next to each other on each side of the guideline for the front feet. Place two oval-like circles for the rear feet, space these a little higher and leave a little space first two.
DEVELOPING FORM
The front legs are short curving lines that touch the paws on the outside edges and a short line in between the paws.
FACE
The face has big cheeks, draw these as two large circles on the lower half of the head. Use a guideline going across the face halfway down the head, the eyes are slightly above the guideline, and the nose is slightly below the guideline. The eyes are almond-shaped pointing downward. There is a little bulge of skin under the eye draw it simply as a line. The nose is a letter "Y" going down. The mouth is two small curving lines going upward in the middle. underneath
EARS
The ears are two long lines going down to a point and back up, give the ears a little curve for interest. You can make them as long as you want since some lop-eared rabbits have very long ears.
The paws are furry and the claws are hidden in the fur.
Erase the extra lines and the guidelines.
FUR
Take your time with, you might want to take a few breaks to do the fur. Use short lines and go over the lines that you drew for the form.
To make the shadows use the same short lines but go over the areas extra and build up the darkness of the fur.
(c) Mr. Adron
 |
| How to Draw A Lop Eared Rabbit Free Worksheet by MrAdron. |
YOU MAY PRINT THE PROJECT NOTES BELOW.
BEGINNINGS
Start with a light pencil like a 2b and draw lightly so you can erase later. Build the shape using circles to compose the structure of the drawing. Draw a circle for the head and a larger circle for the body. Use a guideline down the middle to keep things even. At the bottom add two circles next to each other on each side of the guideline for the front feet. Place two oval-like circles for the rear feet, space these a little higher and leave a little space first two.
DEVELOPING FORM
The front legs are short curving lines that touch the paws on the outside edges and a short line in between the paws.
FACE
The face has big cheeks, draw these as two large circles on the lower half of the head. Use a guideline going across the face halfway down the head, the eyes are slightly above the guideline, and the nose is slightly below the guideline. The eyes are almond-shaped pointing downward. There is a little bulge of skin under the eye draw it simply as a line. The nose is a letter "Y" going down. The mouth is two small curving lines going upward in the middle. underneath
EARS
The ears are two long lines going down to a point and back up, give the ears a little curve for interest. You can make them as long as you want since some lop-eared rabbits have very long ears.
The paws are furry and the claws are hidden in the fur.
Erase the extra lines and the guidelines.
FUR
Take your time with, you might want to take a few breaks to do the fur. Use short lines and go over the lines that you drew for the form.
To make the shadows use the same short lines but go over the areas extra and build up the darkness of the fur.
(c) Mr. Adron
I do not charge you to download my worksheets or lessons. I only ask that you make a small contribution. See the DONATE tab or the PAYPAL button. Your contribution lets me know my worksheets are appreciated and then I will be able to draw more for you. Thank you.